Saturday, May 30, 2015

Caribbean Vacation

My wife, Doris, and I, had a great vacation in the Caribbean this past February. We spent a week on St. Maarten/St. Martin (Dutch side/French side, respectively) followed by a week of sailing among the Windward Islands on the Star Clipper. This post is to discuss the photography aspects of the trip and some brief highlights. 

First of all, what camera kit did I take. When traveling, I like to pack light so I take my Lumix GX7 and two lenses. The GX7 is my "mama bear" camera and can do much of what my GH4 can do, at least what I need for travel photos. I also leave my "best" lenses at home and, instead, opt for the Lumix 14-140mm and the Lumix 7-14mm. These two lenses give me the 35mm equivalent of 14mm to 280mm, a 20-1 spread. The bag is my trusty LowePro Passport II, a very flexible bag for traveling because it can expand with a zip allowing me to quickly stash a windbreaker or such in the extra space. What else is in the bag? Five additional 32 GB SD cards (plus a 64 GB SD card in the camera), two additional batteries (with one in the camera), a BosStrap, a Lance wrist strap, Olympus FL-300R remote flash, portable battery charger, electronic remote shutter release, and a GorillaPod Hybrid mini-tripod. This entire kit weighs five pounds and with the camera in my hands, the bag is a mere three pounds. This is a very light and portable travel camera setup.


I took a lot of video (probably two hours or so) on this trip plus about 600 stills. All of the video was 1080p at 60 fps. The clip below is of the New Status Drum Band. They are based in Phillipsburg but play all around the island. The drummers are boys and girls ages 7 to 17; they are very good. Remember to turn on the sound.


The photo below is of Front Street in Phillipsburg, Sint Maarten. We stayed at Holland House Beach Hotel, a very nice place to stay. Most of Front Street is made of small jewelry stores specializing in diamonds; I assume because of the Amsterdam connection.


Front Street in Phillipsburg

This sign was outside a bar on the boardwalk; I liked the sentiment. Full disclosure: Doris took this photo with her mobile phone.

I was trying to capture a sunset over Great Bay but instead got this unusual "Beam me up" effect.
The Disney Fantasy, easily the most colorful of the cruise ships to dock in Phillipsburg. Notice Mickey on the funnels.

A couple of dive boats in Orient Bay

Parasailor high above Orient Bay

Night view of the Star Clipper Main Deck and Sun Deck

This is how they keep the Pirates off the Star Clipper

The Star Clipper, awaiting our return off St. Kitts

Under full sail

I have a 45 minute slideshow of this trip on YouTube: Sailing the Carribean


Thursday, February 5, 2015

Micro Four Thirds Lenses

This is a survey of Micro Four Thirds (MFT) lenses that I own or have owned. These descriptions are not in-depth reviews but merely observations about the usefulness of the lenses as I see it. MFT has, by far, the best assortment of lenses available of any mirrorless camera system; at least 70 including about 40 from Panasonic and Olympus. I currently own nine of these lenses and previously had six others.

Prime Lenses

First, we will start with primes. Personally, I am partial to quality zoom lenses. With that statement, a certain amount of laziness is on display. With so many excellent zoom lenses available for MFT, prime lenses become niche players where special characteristics make them invaluable like extra speed or macro capability. Since I now only use Panasonic cameras, in-lens stabilization is important. As a result, only shorter Olympus primes are candidates for my collection. That said, all of my prime lenses thus far have been Olympus.


Olympus M.Zuiko 12mm f2.0
This was the first MFT prime lens that I purchased. I no longer have this lens but it was a favorite while it was in my arsenal. One of the best pictures I have ever taken was with this lens. Wide and fast, it works well in low light. Miniscule in size but sturdily built and edge-to-edge sharp, it is a little pricey at $800 but is high-quality all the way. The manual focus ring snaps forward and back between manual and auto-focus. If you need a wide-angle prime, this is the one to get.


Olympus M.Zuiko 45mm f1.8
At $400, this lens is a bargain in the MFT world. It is sharp, fast, compact, and lightweight. Part of the lightness is because this lens has a plastic body rather than metal like the 12mm. I used to shoot portraits with a full-frame 85mm lens so this equivalent 90mm feels perfect to me. If you need this focal length, then this is a great prime lens to have; probably why I kept mine. The manual focus ring doesn't slide back and forth like the 12mm but is is large and easy to turn. Like most Olympus lenses, the lens hood is an extra cost item and no case is included.


Olympus M.Zuiko ED 60mm f2.8 Macro

This is another Oly lens that I really like. The 120mm full frame equivalent focal length works well for macro so you don't have to get right on top of your subject. It can do 1:1 magnification and has distance presets that make the autofocus very fast, particularly for a macro lens. In non-macro mode, this lens can also work as a portrait lens or general short telephoto. At f2.8, it is fast enough to be versatile in low light situations. Again, this is a sharp lens and at $500 is less expensive than the Panasonic 45mm Macro which clocks in at $900 (and some say is not as sharp as the Oly). The extra cost lens hood is unique in that it slides up and down the barrel of the lens for quick activation/deactivation.


Zoom Lenses

The bulk of my lenses are zoom lenses, covering a range from 7mm to 300mm (14mm to 600mm in full frame). I am not a studio photographer and much of my photography isn't much more than semi-planned, so I need the versatility of variable focal length lenses. A couple of my zoom lenses were Olympus but I only used them on Olympus bodies. Now that my Olympus cameras are gone, along with in-body image stabilization, my Olympus zooms are gone, too.


Panasonic Lumix G VARIO 7-14mm f4.0 ASPH.

I call this my "museum" lens. Not because it is old but because it is so useful in tight spaces (like in a museum). Ultra wide angle and sharp but not very fast at a constant f4. There is surprisingly little distortion in this lens, probably justifying the big price. It lists for $1200 but can be found online in the mid $900 range. There is no image stabilization in this lens but that shouldn't be much of a problem at these wide angles. This is one of two lenses I always take when I am traveling. It doesn't get used a lot but when it does, it is indispensable. The lens hood is permanently attached so as to protect the bulging front lens element. A soft plastic lens cover is provided that slides over the outside of the lens hood. You can't use an on-camera flash with this lens because the lens hood will block a large part of the flash, so crank up the ISO. I really like this lens.


Panasonic Lumix G Vario 12-32mm f3.5-5.6 ASPH.
The above picture makes this lens look larger than it is. This is the smallest lens that I own. It is the collapsible kit lens for the GM1 and GM5 While is is not the best lens in the world, it is adequate for everyday shooting, particularly on the tiny GM series of cameras. It is not the most convenient lens to use; to activate the lens, you first have to turn the zoom ring to pop the lens out of it's collapsed state. There is no manual focus ring (no room). Manual focus has to be done on the touch screen of the camera which is not very fast or accurate. Stabilization has to be turned on and off in the camera, as well. That said, it is still a handy lens to have if you want to carry your GMx around in your pocket. It doesn't have a lens hood, again, no place to attach one. If I didn't have a GM5, I would not have this lens. But I do, so I do. By itself, it lists for about $350.


Panasonic Lumix G X VARIO 12-35mm f2.8 ASPH.
This is the lens that I use more than all the others combined. It is part of the "X" series of Lumix lenses which is Panasonic's advanced set of lenses (maybe with exception of the 14-42 pancake lens). This is a super high quality lens with a constant f2.8 throughout the zoom range. It is very sharp with almost instant autofocus. It uses Mega-OIS for stabilization (better than Power-OIS), has nano-coated surface elements to reduce flare, and is environmentally sealed. This is probably the best zoom lens that Panasonic makes and it will set you back about $1,000.


Olympus M.Zuiko ED 12-40mm f2.8 PRO
Olympus' recent competitor to the Lumix G X 12-35mm. Slightly longer with the same constant f2.8 aperture, this is an excellent lens. For me, it was as good as the Lumix but not better. It cost the same, $1,000. When my last Olympus camera went, so did this lens, as it was totally redundant to the Lumix version but without image stabilization. For an Olympus shooter, this is probably the best lens to have; sharp, fast, weather-proof. This is truly a Pro level lens.


Olympus M.Zuiko ED 12-50mm f3.5-6.3 EZ
This was the kit lens for my OM-D E-M5 and it is still available for about $500. This may be the best starter lens on the market. When most other MFT cameras were bundled with 14-42mm kit lenses, Olympus raised the bar with this great little lens; 12mm at wide angle, 4.2x zoom, macro capability, and weather-proof. That's a lot of features in a $500 lens. It is a little slow, particularly at the long end but if you are shooting outdoors in daylight, it isn't a problem. It is small enough to be at home on any size MFT body.


Panasonic Lumix G VARIO 14-42mm f3.5-5.6
This was a kit lens on my Lumix G3 camera and I am glad to be rid of it. This is not the current model 12-42mm lens but an earlier version that is still available for under $200. With so many better lenses on the market, I do not see any reason for this lens to exist. If you like the 14-42mm zoom range, look at the lens below as it is higher quality than this lens. Also, Panasonic makes an "X" series 14-42 lens that is a pancake style with an electronic zoom (no ring, just a button).


Panasonic Lumix G VARIO 14-42mm f3.5-5.6 II ASPH.
This lens is the second generation Lumix 14-42mm and a much better that the first generation (above) and only costs a few dollars more. It is quite a bit smaller than it's predecessor and the build quality is better. Optics are okay but not outstanding. It is small enough to look okay on smaller MFT bodies. This was the kit lens for my GX7 and I still have it so I can bundle it with the camera when next I upgrade. This lens has a street price of under $200.


Panasonic Lumix G Vario 14-140mm f/3.5-5.6
This is my other indispensable travel lens. This lens and my 7-14mm go into my travel camera bag along with my GX7. A very light and compact kit with a focal range from 7 to 140 mm (20 to 1 in just two lenses). This lens should not be confused with it's predecessor, the 14-140mm f4-5.8, which is an inferior lens. The latest 14-140mm is a fine lens, smaller than it's predecessor but better built with a wider aperture. And it is much sharper. This lens is promoted as a video lens and it works very well for that with the 10:1 zoom ratio. It is quiet, fast-focusing, and smooth in operation. Panasonic lists it for $700 (about what I paid for mine) but the street price has dropped to about $550, a real bargain. The older version sells for about $400, so watch out if you are buying.


Panasonic Lumix G Vario Ultra Compact Zoom 35-100mm f4.0-5.6
As the name implies, this is a tiny lens. It is the telephoto zoom companion to the 12-32mm and is meant for the GM1 and GM5 cameras. If you throw this into your bag (or large pocket) along with the 12-32mm and a GM1 or GM5, you have a mighty small kit capable of taking serious, 16 MP photos (or HD video). This lens is obviously more at home in daylight, outdoors. It comes with a tiny lens hood for about $350 street price ($400 list). I haven't had this lens very long so I can't comment on the IQ. We'll see if I like it after the novelty wears off.


Panasonic Lumix G X Vario 35-100mm f2.8 ASPH.
This is the most expensive lens I own and it lives up to it's price. It is another of the Lumix X series and is high quality all the way. Except for traveling, this lens always goes into my camera bag, particularly with the GH4. It is sharp, focuses fast, has the constant f2.8 aperture, and is weatherproof. Plus, it zooms internally (no tube zooming out the front); I wish all my lenses had this feature. It lists for $1,500 but recently, Amazon has been selling them for $1,100 (a hella good price). I use this lens a lot for video, particularly at events where I can get fairly close to the action (gymnastics and soccer).


Panasonic Lumix 
G Vario 45-200mm f4.0-5.6
This was the first individual MFT lens that I purchased (a 14-42mm came with my G3). I bought it because I wanted a longer telephoto zoom and I didn't want to pay much for it. I should have spent the extra money on a better lens. This lens is soft and slow. It was also the first MFT lens that I sold on eBay. It is just not worth the money, no matter how cheap (under $300 street price).


Panasonic Lumix G Vario 100-300mm f4.0-5.6 
Finally, the end of the line. This is my long ranger, used mostly for motorsports and the occasional bird or moon. It is not the sharpest lens in my quiver but it is much better than the 45-200mm. And with a 600mm full frame equivalent reach, it can capture images that I can't even see with the naked eye. Moderately priced at about $600, it is a niche player, but invaluable if you need the length. I'm waiting for Panasonic to come out with a 300mm f2.8 prime (ha!), until then, this is my distance lens.


Thursday, January 8, 2015

My Road to Panasonic


Currently, I am using Panasonic Lumix Micro Four Thirds camera bodies using mostly Panasonic lenses with a couple of Olympus lenses. How did I get to this configuration? Wait a minute, did you just doze off? Well, go ahead and sleep while I explain.
In film days, my first SLRs were Minolta and I loved them. Eventually I moved on to Canon. I have been in and out of photography many times and the last time I got back in was around eight years ago. At that time, I decided I wanted to go with a somewhat smaller DSLR so I took a look at Olympus 4/3 cameras. I had always admired the Olympus OM series and their compactness; the 4/3 Olympus cameras looked like a fine digital follow-on. My first purchase was an Olympus E-410 with two kit lenses.
Olympus E-410
Six months later I moved up to an Olympus E-520 to get more features, most notably, in-body image stabilization. Shortly after the E-520, I purchased one of my favorite lenses of all time, the Olympus Zuiko 12-60mm f2.8-4.0 Digital ED SWD Lens. This was my "goto" lens for several years.
Olympus E-520
After using the E-520 for over three years I was ready to move up to the next range of Olympus cameras (those with two digits in the name instead of three). I picked up a used Olympus E-30 from an online pawn shop and now I had my first "serious" 4/3 camera. It was half again as big as the E-520, had an LCD readout on the top for all the important settings, two wheels for adjusting those settings, a fully articulating LCD screen; a real big boy's camera.
Olympus E-30
While I was enjoying my E-30, I had been reading a lot about mirrorless cameras, in particular, micro four thirds (MFT) from both Olympus and Panasonic. About six months after buying the E-30, I decided to give MFT a try while still holding onto my E-30 in case I didn't like it. The Panasonic Lumix G3 had just come out and the price was reasonable so I ordered one from Amazon. I liked the G3 but thought it was a little too simple for my use. It also felt very plasticky. And then the Olympus OM-D E-M5 was announced and it had some of the best reviews I had ever seen, particularly for a mirrorless camera. It seemed like a game-changing camera so I ordered one along with everyone else (I had to wait quite awhile before it actually arrived).
Panasonic Lumix DMC G3
The E-M5 confirmed me as a micro four thirds enthusiast. I really liked the image quality and the feature set of the camera. The E-30 and all of my accumulated 4/3 lenses went on eBay to find new homes. I took the E-M5 to Europe for an extended visit and it performed admirably. However, I did have some nagging ergonomic issues where I was constantly pushing some buttons unintentionally. Six months pass (are you sensing a pattern here?). I wanted to expand my video capability and had read a lot about how good the Panasonic GH2 was with hacked firmware. The G3, which I hadn't been using much, went to eBay and a new GH2 arrived on my doorstep.
Olympus OM-D E-M5
Here I am going to break the six month new camera cycle. About the time the GH2 arrived, the GH3 was announced, so the two-month old GH2 was given to my son and I moved up. The GH3 had so many nice features compared to the GH2; the ergonomics were better (for me) and HD at 60 fps would prove to be useful, as well. Here is were I mentally started to separate from Olympus. The GH3 was just easier to use than the E-M5. With a good lens, the IQ results were similar between the two for stills and the GH3 was just plain superior at video.
Panasonic Lumix DMC GH2
Panasonic Lumix DMC GH3
I used the GH3 and the E-M5 for most of 2013 and 2014. I tried to think of the E-M5 as my "stills" camera and the GH3 as my "video" camera, but I noticed that I reached for the GH3 far more often than the E-M5, regardless of the type of shooting. It just felt better in my hands. Toward the end of the year, the Olympus OM-D E-M1 came out and I had to have one. Bye bye, E-M5. With the 12-40mm f2.8 Pro lens, the E-M1 was a superior stills camera but I still used the GH3 a lot. 
Olympus OM-D E-M1

About this time, I started to have a serious talk with myself regarding the use of multiple camera brands when I clearly had a preference. I guess I felt bad about abandoning Olympus after so many happy years together. But abandon them I did. I sold my almost new E-M1 and all but two of my Olympus lenses. I think Olympus continuously trying for the "retro" look has been a drag on their ergonomics. They still produce great cameras and lenses but I'm not sure how in touch they are with the marketplace. And the OM-D line is named, in order of capability, E-M10, E-M5, and E-M1. Talk about painting themselves into a corner. Any successor to the E-M1 is going to cause a lot of model confusion (E-M0, anyone?). 
Panasonic Lumix DMC GH4
So, no more Olympus cameras but what about my insatiable and maybe irrational appetite for new cameras? Lucky for me, Panasonic is cranking out lots of new models. Recently, I moved from the GH3 to the GH4 (I'll write a future post on why 4K is important now). I also have a GX7 and a GM5. The GX7 is a super travel camera and the GM5 is, well, just cute. One of these days, Panasonic is going to figure out 5-axis IBIS and it might be game over.
Panasonic Lumix DMC GX7
Panasonic Lumix DMC GM5


Wednesday, January 7, 2015

Why I Shoot Mirrorless

I use mirrorless cameras; more specifically, the Micro Four/Thirds (MFT) subspecies of mirrorless cameras. At any moment in time I think most photographers believe that their chosen equipment is the best; if not for everybody, then at least, for them. Truth be told, there are many fine camera makes and models and most of us would probably be happy with most of them. Given that we usually have some financial and time constraints, we try to settle on one brand and then defend our choice vociferously. In almost every case, the camera is better than the photographer.

This post is not to help me validate my choice because I am already convinced. This is to help others validate their choice or to help them make up their minds if they are on the fence. Since there are many similar articles around the internet, this will just add a minor amount of weight to the mirrorless vs. DSLR debate.

The fundamental reasons I like my MFT cameras are size and weight. I find them so much easier to use than bigger DSLRs. Not only are mirrorless cameras smaller and lighter, their lenses are also smaller and lighter. By removing the mirror, the lens can be closer to the sensor, allowing the lens to shrink. If you use a slightly smaller sensor like I do, camera and lens shrink even more. In most cases, reducing the size of the lens also reduces the cost. My MFT cameras are smaller, lighter, and less expensive than corresponding DSLR cameras; either full frame or APS-C format. Another, less talked about, reason for choosing mirrorless cameras is innovation. Most of the manufacturers of mirrorless cameras have been innovating at a much faster rate than the traditional DSLR manufacturers (read Canon and Nikon). They have been coming out with new models and new features at an astonishing clip.

Another feature of mirrorless cameras made possible by the reduction in distance from lens to sensor is the ability to use lens adapters. In the MFT world, there are lens adapters for just about any DSLR or SLR lens ever made. This has made the transition to mirrorless easier for many because they could still use their expensive legacy lenses with the new cameras, albeit usually without autofocusing.

I do a lot of travel photography so the size and weight of my photography kit is extremely important. The smaller/lighter argument for mirrorless really strikes home when trudging around tourist sites all day. My cameras and lenses weigh about 1/2 that of full frame DSLRs and without a discernable difference in image quality. The high-end DSLR folks will fuss a little about low-light capability and sniff about "bokeh" but if those are the only rafts on which to cling, they had better learn to swim.

If they are so good, why haven’t there always been mirrorless cameras (I’m not counting rangefinder cameras from the film days)?  For me, the breakthrough in technology that made mirrorless cameras practical was the evolution of the electronic viewfinder (EVF). Lacking a mirror and a prism to allow the user to look through the lens, the mirrorless camera must extract that information from the camera’s sensor and display it on a tiny electronic screen in the viewfinder. I had a couple of super-zoom “bridge” cameras before the mirrorless boom and the EVFs were terrible. The color was wrong, they were laggy, and the resolution looked like Minecraft. But the EVF technology evolved rapidly and when it got to a certain point, mirrorless cameras with a viewfinder (not just an LCD screen to be viewed at arm’s length) became cameras that could actually be used like a DSLR. EVFs also brought along the ability to have a bright image even when the subject was dark, a very useful feature.

Now I use Micro Four Thirds mirrorless cameras that have awesome image quality, leading edge features, and are smaller and lighter than their traditional brethren. I was once a Canon shooter, then Olympus, and now Panasonic. In my next post I will trace the path to where I am today.


Powered by the Sun

Because I often get questions about our solar electricity system, I am migrating this post from DosGatos.net. This was written in late 2009.

Well, we finally did it - we installed a solar electricity system on our house.  I say "finally" because we've been talking about solar for a couple of years but I couldn't overcome my inertia to call some contractors.

First, a short review of solar electricity for home use.  Photo-voltaic (PV) solar panels generate electricity when exposed to sunlight.  They generate Direct Current (DC), the type of electricity generated by batteries.  Your house uses Alternating Current (AC) electricity so an inverter must be used to transform the DC from the panels to AC for use in the house.  Electricity that is generated but not consumed on the premises (excess) feeds into the power grid and helps power everyone else.  When you are generating excess electricity, you get a credit from the power supplier, in our case, Pacific Gas and Electric Company (PG&E); this is what happens when your electric meter spins backwards because you are generating onto the grid.  When the meter spins backwards, it subtracts from your kilowatt hour usage, giving you a credit.  You will use some or all of this credit when the sun goes down and you are no longer generating any electricity at all.  In this way, the power grid sort of acts like a virtual battery to store the electricity you generate so you can use it later.  Actually, the meter spinning backwards doesn't actually happen any more because PG&E uses new, smart digital meters for solar installations that do not have that spinning wheel, but you still get the credit via electronics.  If you are a PG&E customer, you can get your last two years of electricity usage in kilowatt hours by month on their web site.  This is useful in planning the capacity of your solar system.  PG&E also has some energy audit stuff on their web site but it mostly deals with stuff you probably already know. 

To help determine the real power usage of some of the devices in the house, I use a "Kill A Watt" model P4400.  I picked it up on Amazon.com for 20 bucks.  You plug it into an electrical outlet and then plug the device you want to measure into it.  It gives a variety of readouts but the two most important are the watts consumed in real time and a cumulative kilowatt usage over time.  Using it, we have determined that we need a new refrigerator and computers that are not in use should be turned off or put to sleep.

In July, I started my search for contractors and began my education on solar electricity.  There is a wealth of information about solar electricity on the internet.  The California Energy Commission (CEC) maintains a list of solar contractors on their web site.  The list can be searched using various criteria; I asked for contractors that did business in Santa Clara County and then I looked at their web sites to get a feel for their capabilities.  I settled on four contractors and started calling.  The four I chose were: Horizon Energy SystemsRenewable Energy Concepts (REC), ReGrid Power, and Vista Solar.  All of the companies except REC sent out a representative that was a salesman that also did the pre-engineering work on the system design; REC sent a person that was sales only.  Ultimately, they all made proposals but I eliminated REC early on because their proposal was made without measuring the sunlight available and the price seemed to shift around a lot.  ReGrid was very late with their proposal because their rep got sick; unfortunately that dropped them out of consideration.  Vista and Horizon had very similar bids but Horizon's plan produced more power by using photo-voltaic panels that produced more power.  We accepted the Horizon proposal but I want to stress that we could have done business with Vista or ReGrid just as easily.  I liked all three of these companies; they were all professional, courteous, knowledgeable, and patient.  REC was the only company of the original four that made me uncomfortable.

I'm going to discuss the price here because I think most people considering a solar electric installation would like to know what it might cost.  Each installation is unique but should be in the same ballpark as our cost for an equivalent sized system.  Our installation was relatively standard:  a south-facing roof with a few shade tree issues.  Our system is probably larger than average at 6.7 KW DC (5.5 KW AC).  It consists of 30 Sharp photo-voltaic panels (model ND-224U1F) that are rated at 224 watts DC, a Fronius IG Plus 6.0 240 volt inverter, a couple of circuit breakers, rails and hardware for the panels, and all installation labor.  Also included with our system was a thermostatically controlled attic fan to help reduce our air-conditioning load in the summer.  The price, with tax but before rebates and credits was $38,711.  The California Solar Initiative (CSI) rebate, paid directly to the contractor, reduced this by $7,683.  We paid Horizon the remaining $31,028 but will receive a 30% federal tax credit of $9,308 when we file our income taxes next year.  That reduces that actual out of pocket expense to $21,720.  Based on current electricity price trends and our own usage patterns, the system should pay for itself in a little over seven years.  It also adds about $40,000 to the value of our house.  I'm not including about $2,800 in tree work as we had a severe shade problem at the west end of our roof.  We topped some trees, removed three trees, and planted three more trees to replace the removed trees (the new trees are a shorter variety so they won't cause the same shading problem).

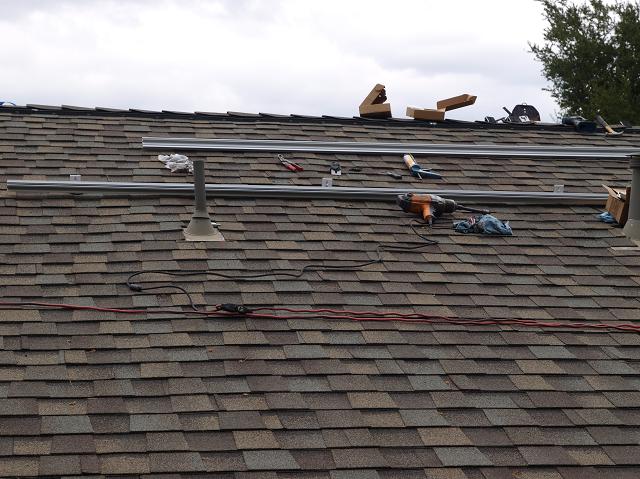
The installation was done in mid-October and took four days.  The working crew size varied from seven (on the first day) to three (on the last day).  Part of the work included relocating three plumbing vent pipes in the roof.  They spent a lot of time getting the rails straight on our somewhat wavy roof.  Here are some progress pictures. 

First, the roof before any solar work:


Day 1 - a driveway full of Horizon Energy trucks:


Day 1 - a roof full of Horizon Energy workers:


Day 1 - the first rail is getting installed:


Day 1 - the first rail is complete:


Day 1 - two rails are installed by the end of the day:


Day 2 - the rest of the rails are installed:


Day 3 - 30 Sharp photo-voltaic panels arrive:


Day 3 - Fronius inverter installation:


Day 3 -panel test fitting; also, this was the day the vents were moved:


Day 4 - about half the panels are installed and wired together by noon:


Day 4 - testing a string (10) of panels; that's a 250 VDC 9 amp spark:


Day 4 - securing the tops of the panels at the end of the day; the shade in this picture is now gone after some tree work:


First day of operation - 6 KW from the sun:


The solar system has been operating a couple of weeks now and we have generated more electricity than we have used.  When you connect a solar system to the PG&E grid, your electric billing changes to an annual reconciliation.  A year's worth of generation is subtracted from a year's worth of usage and if you used more than you generated, you pay PG&E.  However, thanks to a shiny new law in California, if you generate more than you use, PG&E pays you.  I think we will be a little short on generation this year but we might be able to conserve our way into the black.  In any case, our carbon footprint just got a whole lot smaller.